How to Install Adjustable Picture Hooks: A Step-by-Step Guide
In this comprehensive guide, we’ll walk you through the entire process of installing adjustable picture hooks for flawless results.
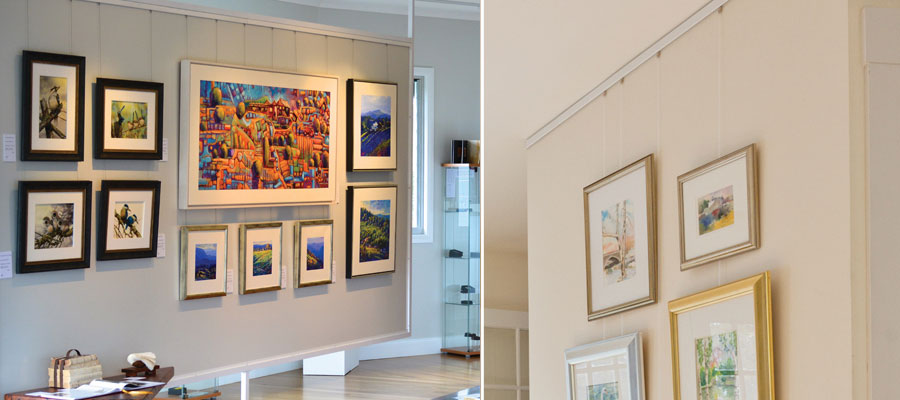
When it comes to displaying artwork, photographs, or decorative pieces, adjustable picture hooks provide an ideal solution for precise positioning and easy adjustments. Whether you're designing a gallery wall, hanging heavy artwork, or showcasing family photos, these versatile hooks offer flexibility and stability. In this comprehensive guide, we’ll walk you through the entire process of installing adjustable picture hooks for flawless results.
Why Choose Adjustable Picture Hooks?
Before diving into the installation process, let’s explore why adjustable picture hooks are a preferred choice for both residential and professional setups.
Key Benefits of Adjustable Picture Hooks
-
Precision Adjustment: Easily move your artwork up or down without removing the hook.
-
Strong and Secure: Designed to hold varying weights, from lightweight frames to heavy mirrors.
-
Minimal Wall Damage: Reduces the need for excessive drilling or nail holes.
-
Flexible Design: Perfect for creating gallery walls, arranging multiple frames, or regularly changing displays.
-
Easy Installation: Designed for both DIY enthusiasts and professional installers.
For those seeking high-quality hooks, check out adjustable picture hooks for reliable options that ensure your artwork stays securely in place.
Tools and Materials Needed
Before starting your installation, gather the following tools and materials:
✅ Adjustable picture hooks
✅ Measuring tape
✅ Pencil for marking
✅ Spirit level (for alignment)
✅ Drill and appropriate drill bits
✅ Wall plugs (if fixing into plaster or brick)
✅ Screwdriver
✅ Hammer (for wall plugs if required)
✅ Soft cloth (to clean the surface)
Having these tools on hand will make the installation process smoother and ensure your hooks are securely mounted.
Step 1: Plan Your Layout
Proper planning is key to achieving a balanced and aesthetically pleasing display.
1. Measure Your Wall Space
-
Start by measuring the wall area where you want to hang your pictures.
-
Use a pencil to lightly mark the desired positions for each frame.
2. Determine Frame Heights
-
For optimal viewing, artwork should generally hang at eye level (approximately 57–60 inches from the floor to the center of the picture).
-
If hanging multiple pieces, ensure the spacing between frames is consistent for a clean look.
3. Mark Hook Positions
-
Once you've finalized the layout, mark the spots where each adjustable picture hook will be installed.
-
Use a spirit level to ensure the markings are aligned horizontally.
Step 2: Install the Picture Hanging Hooks
Proper installation ensures your hooks are stable and secure.
1. Choose the Right Hook Type
-
Some adjustable picture hooks are designed for wall-mounted tracks, while others are secured directly onto the wall.
-
For track systems, follow the manufacturer’s guidelines for positioning and assembly.
2. Drill the Holes
-
For direct wall installations, use the correct drill bit size for your wall type (e.g., plaster, brick, or concrete).
-
If you're using wall plugs for additional stability, gently tap them into the drilled holes with a hammer.
3. Secure the Hooks
-
Attach the hook base to the wall with screws or mounting hardware.
-
Tighten the screws firmly to ensure stability but avoid overtightening, which could damage the wall or the hook.
4. Test the Hook’s Stability
-
Gently pull on the hook to ensure it's firmly secured.
-
For track-based hooks, slide the hooks into position along the rail and adjust them to the desired height.
Step 3: Hang Your Artwork
With the hooks securely in place, it’s time to mount your artwork.
1. Attach Hanging Wires or D-Rings
-
For frames without hanging wires, install D-rings or sturdy hanging hardware on the back of the frame.
-
Ensure the wire is securely fastened and positioned evenly on both sides.
2. Position the Frame on the Hook
-
Gently place the hanging wire or D-rings onto the adjustable picture hooks.
-
For heavy frames, ensure the wire rests securely on the hook’s deepest groove to prevent slipping.
3. Adjust the Height
-
One of the major advantages of adjustable picture hooks is their flexibility.
-
Slide the hook up or down to achieve perfect positioning.
4. Check for Level
-
Use a spirit level to ensure your artwork is perfectly aligned.
-
Make slight adjustments as needed by moving the hook’s position.
Step 4: Final Touches and Maintenance
To keep your artwork secure and your walls looking great, follow these maintenance tips.
1. Secure Loose Wires
-
Periodically inspect your hanging wires to ensure they remain taut and properly positioned.
2. Clean the Hooks
-
Dust your adjustable picture hooks regularly using a soft cloth.
-
Avoid using harsh chemicals that may damage the hook’s finish.
3. Check Weight Limits
-
Overloading hooks can lead to instability. Always follow the manufacturer’s recommended weight limits.
4. Reposition as Needed
-
If you frequently change your wall displays, adjustable picture hooks make repositioning hassle-free without additional drilling.
Common Mistakes to Avoid
To achieve a flawless installation, avoid these common pitfalls:
❌ Skipping the measuring step, which can lead to unevenly spaced frames.
❌ Using incorrect drill bits or wall plugs, resulting in unstable hooks.
❌ Ignoring weight limits, potentially causing damage to both the frame and the wall.
❌ Over-tightening screws, which can weaken the wall’s structure.
By following these steps and tips, you'll enjoy a professional-looking display that’s both stylish and secure.
Conclusion
Installing adjustable picture hooks is a practical and efficient solution for displaying your artwork beautifully and securely. Whether you’re arranging a single statement piece or designing a full gallery wall, these hooks provide unmatched flexibility and precision. For those looking for durable and reliable options, explore adjustable picture hooks for top-quality solutions.
With proper planning, the right tools, and attention to detail, you’ll create a stunning wall display that elevates your space.
FAQs
1. Can I install adjustable picture hooks on a plaster wall?
Yes, you can. However, ensure you use appropriate wall plugs and screws to secure the hook firmly and prevent damage.
2. What weight can adjustable picture hooks support?
The weight limit varies by brand and design. Some hooks can support up to 15 kg or more, making them ideal for heavy frames or mirrors.
3. Are adjustable picture hooks suitable for rental properties?
Absolutely! Many systems minimize wall damage and allow repositioning without leaving noticeable marks.
4. How can I keep my artwork level after hanging?
Using a spirit level during installation ensures precision. For ongoing adjustments, adjustable picture hooks allow easy fine-tuning.
5. Do I need professional help to install adjustable picture hooks?
While DIY installation is manageable, hiring a professional may be worthwhile for larger displays or valuable artwork.
What's Your Reaction?